
Looking to setup hdmi fuser? Setting up an HDMI fuser for DMA Wallhacks ESP can significantly enhance your gaming experience by providing a clearer display and useful in-game overlays. Here’s a step-by-step guide to help you get started.
Supported Resolutions
The HDMI fuser supports a range of resolutions to ensure compatibility with different monitors and gaming setups. The supported resolutions are:
- 1920×1080 (Full HD)
- 2560×1440 (QHD)
- 3840×2160 (4K UHD)
- 2560×1080 (UltraWide Full HD)
- 3440×1440 (UltraWide QHD)
Refresh Rates
To make the most out of your gaming visuals, the HDMI fuser supports the following refresh rates:
- 4K @ 60Hz
- 2K @ 144Hz
- 1K @ 240Hz
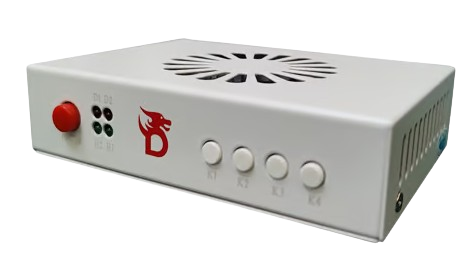
Indicator Lights
Understanding the indicator lights on your HDMI fuser is crucial for proper setup and troubleshooting. Here’s a breakdown of each light and what it signifies:
- 【D1】: Power Light
- This light should be always on to indicate that the HDMI fuser is receiving power.
- 【D2】: Fusion Overlay Function On/Off Indicator Light
- This light indicates the status of the fusion overlay function. If the light is on, the function is active.
- 【H2】: HDMI2 Slave Input Signal Light
- This light shows the status of the HDMI2 slave input signal. It should be always on to confirm that the signal is being received properly.
- 【H1】: HDMI1 Host Input Signal Light
- Similar to the HDMI2 indicator, this light confirms the status of the HDMI1 host input signal. It should also be always on when the signal is properly received.
Connection Ports
Properly connecting your devices is key to ensuring everything works smoothly. Here’s a breakdown of the ports:
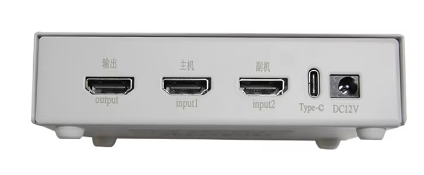
- 【HDMI Output】: Connect this to your gaming PC monitor.
- 【HDMI1 INT】: Connect this to your gaming PC graphics card.
- 【HDMI2 INT】: Connect this to the graphics card of a secondary PC, if applicable.
- 【UART】: This port is used for updating or flashing the firmware.
- 【DC12V】: Connect the power supply via the provided power cord (default 12V2A).
Key Functions
Understanding the key functions helps you utilize the HDMI fuser effectively:
- 【Power】: This is the power switch to turn the device on or off.
- 【K1】:
- Short press: Cycle through supported resolutions (1920×1080, 2560×1440, 3840×2160, 2560×1080, 3440×1440), with the factory default set to 1920×1080.
- 3-second press: Displays the current resolution and refresh rate in the upper left corner of the screen, with host information on the top and slave information on the bottom.
- 【K2】:
- Short press: Cycle through 21 levels of upper layer RGB cutout intensity, ranging from 0 to 20, with the factory default set to 0 (0 also cuts out the picture).
- 【K3】:
- Short press: Restore the upper layer RGB cutout strength to the factory default of 0.
- 【K4】:
- Short press: Turn the fusion overlay function on or off.
Step-by-Step Setup Guide
- Connect Your HDMI Cables
- Connect the HDMI1 input to your gaming PC graphics card.
- Connect the HDMI2 input to the secondary PC graphics card, if required.
- Connect the HDMI output to your monitor or display.
- Power Up the HDMI Fuser
- Plug in the power adapter and check the D1 power light. It should be on, indicating that the device is powered.
- Check Input Signals
- Verify that both the H1 and H2 lights are on, ensuring that the input signals from your devices are being received correctly.
- Activate the Fusion Overlay Function
- Check the D2 light to see if the fusion overlay function is active. If it is not, you might need to activate it manually by pressing K4.
- Adjust Display Settings
- Use K1 to cycle through the resolutions and set your preferred one. Hold K1 for 3 seconds to display the current resolution and refresh rate.
- Adjust the RGB cutout intensity using K2. Press K3 to reset to the default intensity.
- Toggle the overlay function on or off using K4.
By following these steps, you can set up your HDMI fuser for DMA Wallhacks ESP effectively, ensuring you have the best possible gaming experience with high resolution and refresh rates. Enjoy your enhanced visuals and in-game overlays!
Want To Get Started With DMA Cheats?
Click Here to Join our exclusive Discord community to get started cheating in your favorite video games!
- SUPPORT: Get personal help and tips directly from me
- COMMUNITY: Connect with fellow DMA gamers and find teammates
- UPDATES: Be the first to know about new updates and features